#3343 Dustpan, Shovel, Beads & Skewer Part 2 Fluid Acrylics Pouring 9.01.18
725 views · Published 8 September 2018 · 20:00 · Indexed 28 October 2026
Channel: Expressionist Fluid Art Studio Priscilla Batzell · 2018 · Howto & Style
#3343 Dustpan, Shovel, Beads & Skewer Part 2 Fluid Acrylics Pouring 9.01.18
Part 1)- https://youtu.be/7DlAkWCISs0

LINKTREE link Below
https://linktr.ee/PriscillaBatzell
[email protected]
Please use the email above to contact me for more information about a Private lesson or the purchase of original Artwork.
 Purchases of artworks and your purchases on my Amazon link help support the creation of videos.
 When inquiring about the purchase of YouTube Video art please include the date and file reference number found at the end of every video title.

 To Receive Notifications, click the bell near subscribe.
Sharing and liking and posting the video helps me in so many ways and supports the continuation of doing what I love and the creation of video tutorials. Thank you to all that support my mission to break down creative barriers and help inspire those who wish to find joy in painting.

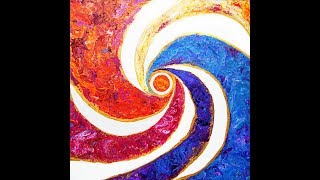
I primed an18"x24" stretched canvas with a layer of white paint. All the paints I use are acrylic paints mixed with additives to help them flow more easily. All my colors are stored and mixed in squeeze bottles for ease of use. I added many colors to a small plastic dustpan to use. I remove the combined but not mixed together colors with a small plastic shovel and a small scoop, depositing them onto the canvas in sweeping stripey areas and puddles. I tip the canvas to spread the paint and create patterns. I use beads dipped into the paint and then dragged along and a bamboo skewer to push and pull the colors as well as a small silicone spatula. Along the way, I use a sheet of plastic pressed against the edge of the canvas and as I tip the canvas and the paint rolls to the edge I stop it allows a small amount over the edge, and push the rest back onto the canvas, adding to the patter and saving the paint.
I use a propane torch cautiously, passing it over the surface of the canvas to release any air in the paint that might result in bubbles forming while the artwork dries or leaving pockmarks if left to pop on their own.
Warming the paint will also often encourage patterns to emerge because the paint in combination with the Floetrol used in my pouring mix encourages cells to form.

My "pouring" mixture is 3/4 Floetrol with 1/4 (estimated) GAC800 from "Golden" (prevents cracking and adds shine to dry artwork.)mix into it thoroughly. Depending on the paint the amounts of color can vary. I like to begin with half pouring mixture and half color. After that is mixed VERY thoroughly I add more pouring mixture until the viscosity (thickness) is like warm hone. If I want it thinner I add more Pouring mixture. If the color is not strong enough I add more pigment. When mixing colors my amounts are always estimated and then altered to get the right consistency I like. I use plastic squeeze bottles with measurements on the side. I add a marble to my bottle to aid in the mixing process. Marbles work well but exercise caution if you end up with more than one they will shatter in the mixture eventually. It's imperative (Important) that all mixture be shaken thoroughly once before using in any session the first every time! The consistency is usually medium "body" weight, but other weights are usable with minor adjustments. All my acrylic paints are mixed in advance and contained and stored in squeeze bottles. If you are not using squeeze bottles, I suggest using a container that has a tight-fitting lid or seals the container with Glad sticky wrap. I have often used the 4oz size plastic deli containers, and the paint keeps for a long time in them, but you must stir before using the mix again. Floetrol and other flow agents will rise to the top between uses. None of my acrylic paint has any added silicone. To create the pearlescent effects seen in most of my artworks, I use "Golden's" Iridescent pearl "Fine" added to colors. I add a good squirt directly into whatever I am mixing in. I recommend experimenting to find out how much is enough for your ideal shimmer.

Every day I learn new things. I will never stop experimenting, and I am happy to share what I discover with you.
To see finished wet and dry versions of all my Youtube demonstration artworks for sale, visit my Expressionist Art Studio Gallery Fans and Collectors group on Facebook
#3337  wet, shown in this video.
More from this channel
-
 9:14
An Art Exhibition In The Hallway Gallery At Expressionist Art Studio Priscilla Batzell 4.08.2018
-
 17:11
#2518 Superb Dynamic Black Swipe Fluid Art Acrylic Pouring 4.13.18
-
 11:50
#2543 Fluid Acrylics Part 2 Abstract Garden (Accidental Recording) 4.17.18
-
 20:01
#2559 Mountain Sunset Swipe Fluid Acrylics Pouring Part 1-4.19.18
-
 19:48
#2573 Scooped Skewered & Knifed, Dynamic "Sweep" Fluid Acrylics Pouring 4.21.18
-
 15:19
#2589- Dramatic Yellow Swipe, Long & Tall Fluid Acrylics Pouring 4.22.18
-
 12:22
#2603 Playful Fun Experiment Fluid Acrylics Pouring Art 4.24.18
-
 16:02
#2605- Flip cup - Drag Slide Fluid Acrylics Art 4.23.18