Photoshop CC 2015 Web Design Tutorial | Clipping Mask in Photoshop for Websites - 31/48
2,877 views · Published 23 October 2015 · 3:48 · Indexed 5 October 2026
Channel: Bring Your Own Laptop · 2015 · Howto & Style
Limited time: Reignite your creativity — get 30% off BYOL:  https://byol.com/youtubemay26
Full course at: https://goo.gl/Y1Tgbm
Free Exercise Files: https://goo.gl/RBfD2X
Free Cheat Sheet: https://goo.gl/6JFJi4

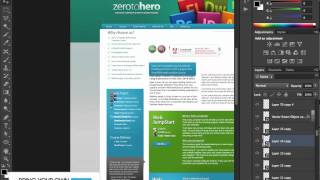
Photoshop CC 2015 Web Design Tutorial, How to make a Clipping Mask in Photoshop for Websites 31/48

======================================================

Video transcript:

0:00hey there my name is Dan by the end of
0:03this video you'll learn about the
0:04amazing clipping mask and how it crops
0:06images for your Photoshop web design
0:08mockup this particular video is a free
0:10extract from my course called how to
0:12make money building professional website
0:13mock-ups using Photoshop if you're
0:15serious about making money as a web
0:16designer there's a discount code for you
0:18in the description all right that's
0:19enough sales let's start cropping images
0:21like a pro alright in this video we're
0:23going to look at how to use a clipping
0:25mask now a clipping mask is a really
0:27great way of cropping an image down to
0:29use let's see what that final products
0:31going to look like it's the square image
0:33here i'm going to show you how to do
0:34that with what's called a clipping mask
0:35first thing is let's turn this i bought
0:38off on our image books layer and what we
0:40do is we start with a rectangle i'm
0:42going to turn my guides back on command
0:44colon okay and I want it to span say for
0:49guides here I want it to be a perfect
0:51square so what I do is a hold down shift
0:53while I'm dragging it and can you see it
0:55locks the height and width alone okay so
0:57I'm going to drag it so it fits across
0:59these for now it doesn't really matter
1:01what color we're going to use at the
1:02moment because clipping masks don't
1:03matter that much I'm going to use my
1:04move tool and I'm going to move it down
1:06a little bit so it's kind of in the
1:07center of my box and what I want to do
1:09now is pop them in and I'm going to turn
1:11my image back on now my image needs to
1:16be a bit more of an appropriate size for
1:18this square so I'm going to use my with
1:20a layer select and use my transform tool
1:22come on T okay or ctrl key on a PC and
1:25I'm going to holding the shift key down
1:27on the corners to lock the height and
1:29width otherwise it ends up kind of
1:30stretching it and distorting it so I'm
1:32going to use the shift key down and then
1:34I'm not too worried that it's going to
1:35be perfect around here I'm kind of
1:37cropping it in for effect and hit enter
1:39when it's transforms done what I need to
1:41do is I need to make sure that the image
1:43is above my rectangle i'm going to
1:44rename this rectangle and let's call
1:46this one the this one's the and who
1:50image so my who we are page okay so he's
1:54underneath now what I want to do is crop
1:56this guy okay which is the image read
2:00the books to the square to do it the
2:03easy way is with the image layer
2:05selected hold down the alt key can you
2:07see this little icon here with the box
2:08with arrow this is going to turn top
2:10image and bottom image and join them
2:12together and
2:13make a clipping mask you can see what
2:15happened in the structure here in the
2:16layers and you can see what's happened
2:17over here in my actual image I don't
2:20turn my guides off to make it pretty the
2:22beauty of it is that this kind of who
2:24box underneath here and this image is
2:28actually they're actually separate so I
2:30can move them around so what i can do is
2:31let's say that the box i want to crop
2:34slightly differently and i haven't
2:37selected here watch this will my move
2:38tool I can move it around you seem kind
2:40of move it around and adjust it's like a
2:42little window likewise the image
2:44underneath can be moved around the box
2:46around can be moved around to find where
2:47you need to go now what you want to be
2:49careful of if you want to move them both
2:51together you need to hold command down
2:52and click them both okay with them both
2:55selected I can move them around now if
2:57you want to move them around permanently
2:59together well not have to select them
3:02both is you can right-click these two
3:04okay after the selected and there's one
3:06in here that says link layers you see
3:08this linking icon appears just means

======================================================

Facebook:https://www.facebook.com/BringYourOwnLaptop
G+: https://plus.google.com/+ByolAuAdobe
Twitter: https://twitter.com/danlovesadobe/
Pinterest: https://www.pinterest.com/byolaptop/
Website: https://www.bringyourownlaptop.co.nz/
Course Url: https://goo.gl/lQKAZr

Trending topic on youtube

#Adobe #Photoshop #Tutorial
#HowtoDesignaWebsiteinPhotoshop
#PhotoshopTutorial
#CC_2015
#DesignAWebsite
#Clipping_Mask

Thanks and Subscribe Channel
More from this channel
-
 5:43
Photoshop training courses - Advanced Layers with Dan.
5:43
Photoshop training courses - Advanced Layers with Dan.
-
 3:52
Adjusting Content - InDesign CC Tutorial [7/20]
3:52
Adjusting Content - InDesign CC Tutorial [7/20]
-
 3:19
Should you use a local or a .com domain name for your business - Buying a domain name [3/9]
3:19
Should you use a local or a .com domain name for your business - Buying a domain name [3/9]
-
 5:27
How to buy domain name from GoDaddy - Buying a domain name[7/9]
5:27
How to buy domain name from GoDaddy - Buying a domain name[7/9]
-
 5:03
How to buy a domain name from someone - Buying a domain name [8/9]
5:03
How to buy a domain name from someone - Buying a domain name [8/9]
-
 2:41
Photoshop CC 2015 web design tutorial - Tips for Zooming & Navigating Your Document Part 9/48
2:41
Photoshop CC 2015 web design tutorial - Tips for Zooming & Navigating Your Document Part 9/48
-
 2:07
How To Use Eye Dropper Tool For Web Design | Adobe Photoshop CC 2015 Tutorial 2017 Part - 12/48
2:07
How To Use Eye Dropper Tool For Web Design | Adobe Photoshop CC 2015 Tutorial 2017 Part - 12/48
-
 3:27
Photoshop CC 2015 Web Design Tutorial - Layer Shortcuts you need to know Part 11/48
3:27
Photoshop CC 2015 Web Design Tutorial - Layer Shortcuts you need to know Part 11/48